You are here: 4. Point of Sale > 4.4. POINT OF SALE Menu: Transaction Processing > 4.4.3. Point of Sale - Docket Creation > Entering the Item Details

Entering the Item Details

You add items to a docket, layby or quote using the Item Details screen. You also use this screen to:


Technical Tip

2.8 Feature

If your company is set up for ICT (inter company trading – see "Edit - Program - Inter Branch Transfer"), and some lines on a POS docket have already been delivered to the customer and invoiced at head office, you can still edit and split other lines on the POS docket by following the steps below.

To access and maintain the item details:

  1. Create a new docket, layby or quote or recall an existing one.

Refer to "Creating a New Docket, Layby or Quote".

Micronet displays the Item Details screen. Continue from step 4 below.

  1. Alternatively, recall an existing docket, layby or quote.

Refer to "Recalling a Docket, Layby or Quote".

Micronet displays the Enter Transaction screen.

  1. If you want to:

If you selected to add, insert or edit an item, Micronet displays the Item Details screen.

  1. Complete the following fields:


Field

Value


Item Number

Enter the number of the item to be sold to your customer. You can also press Tab or Enter to select an item. Alternatively, you may enter a value for Item Number via a barcode reader.

If you are processing the sale of a gift voucher, press Enter to display the Item Selection screen and select the appropriate gift voucher item. Micronet displays the Enter the Gift Voucher Information screen – see "Item Details - Processing Gift Vouchers" for information about using this screen.


Reference

  • If your user security is setup to allow the creation of temporary items during transaction processing, Micronet displays a Create Item button to the right of the Item Number field – see "Item Details - Creating Temporary Items" for more information about creating temporary items.
  • If your company is configured for multiple bin locations and your userID allows you to edit bin locations, Micronet displays the Bin Locations and Quantities screen – see "Item Details - Selecting Bins and Quantities" for more information.


Description

Micronet displays the description of the selected item from the Inventory master file. Note that you can't change the description.


Technical Tip

2.8 Feature

If you select an item that has been set up with unit recognition, Micronet automatically displays the Unit Recognition screen so you can enter the quantity in the appropriate units (e.g. square metres, boxes, pallets, etc.).

For tile products, and where multi bins are turned on but your user ID does not allow you to edit multi bins, Micronet skips the Unit Recognition screen and goes straight to the Edit Units screen where you can enter the quantity ordered in the correct units.


Available

Micronet displays the quantity of the item available, in sales units.


Units

Micronet displays the unit of measure for the item from the Inventory master file, e.g. EA for each – see "File - Inventory - Item".


Ordered

Enter the quantity of the item that the customer is ordering.

If you are using barcode readers and scanning mode, you can change the quantity by pressing Page Down.

If you want to split the order into separate deliveries, select the browse (...) button next to this field and perform a quantity breakdown – see "Item Details - Quantity Breakdown".


Technical Tip

  • If the item is out of stock, when the order is processed Micronet prints both an order confirmation and a purchase order for the items requiring orders.
  • The ordered amount defaults to 1 unit, unless there are minimum units set up for the item. If alternate units have been set up, the quantity is according to the alternate unit. For more details on alternate units, see "File - Product Category - Alt Units" and "File - Inventory - Extra".
  • If you change the ordered quantity of an item for which a discount has been entered, Micronet displays a message that it is resetting the discount to zero. Select OK to clear the message. You will need to re-enter the discount on the item.


Delivery Options

Select how the items will be delivered to the customer. You can select a different delivery option for each item on the sales docket, removing the need for multiple sales dockets.

For all cash sales, the delivery option defaults to the option where the customer is taking the item with them (e.g. Pickup or Taken).

For account sales, you need to select the appropriate delivery option, e.g. the customer is taking the item with them, a purchase order needs to be raised for the item, or the supplier is delivering the item to the store or the customer.


Reference

The delivery options displayed are defined in your company configuration – see "Edit - Applications - POS - POS Enhanced".


Technical Tip

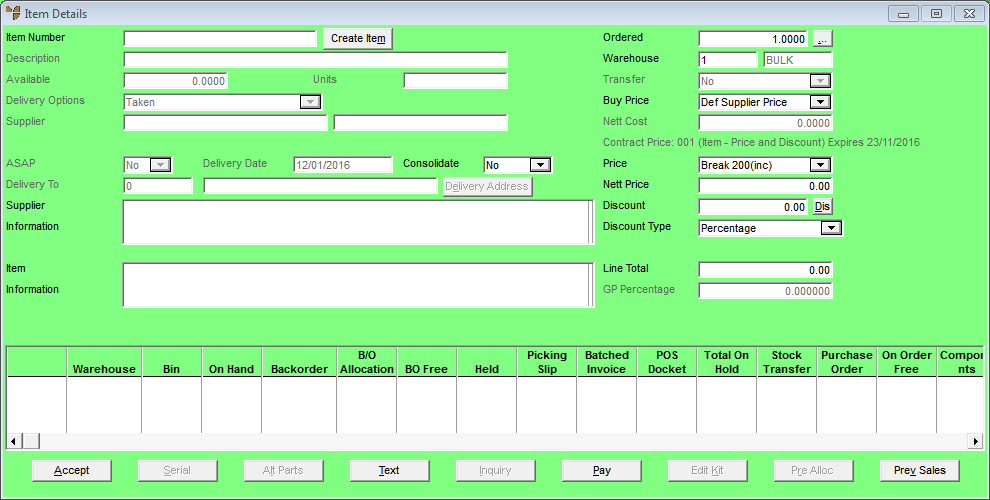
Some delivery options create automatic stock transfers. If you edit a line on a POS order that is linked to an automatic stock transfer, Micronet will not automatically update the stock transfer line because, if the stock had already been picked, it would result in the incorrect movement of stock.

If you want to edit an order line that is linked to an automatic stock transfer, you should manually update the stock transfer line in MDS – see "Entering Stock Transfer Lines". If you just edit the quantity, the link to the POS order line will be retained. If you delete a POS order line then re-enter it, the link will not be retained and you will need to create the new line in the stock transfer as well.

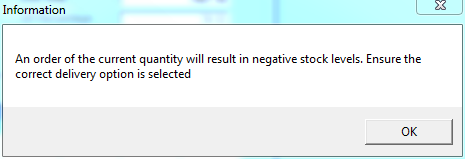
Note also that Micronet will create an automatic stock transfer line even if there is insufficient stock in the warehouse supplying the stock. A warning message will advise you that there is not enough stock on hand. The stock transfer line will remain in Transfer Request status on the POS Order Scheduler, whether or not there is enough stock on hand. The From warehouse can release the transfer docket if they have the stock available, or source the stock and release the transfer docket when the stock is received. For more information, see "Stock Transfer Creation - File - Load POS/MDS Created Transfer" in the Distribution System manual.


Supplier

If the item is out of stock, enter the preferred supplier for the item or press Tab or Enter to select a supplier. The purchase order is raised against this supplier. If necessary, you can override the preferred supplier on the docket so that the order is raised against a different supplier.


ASAP

2.8 Feature

Select whether you want to enter a delivery date against this item. Options are:

  • Yes – a delivery date will be entered against the item. If a purchase order is created via the delivery option selected, the Due Date on the purchase order line will also be set to this date.
  • No – a delivery date may be entered against the item but it is not mandatory. If a purchase order is created via the delivery option selected, when the Due Date is updated on the purchase order line, Micronet sets the item's date required to the same date.
  • TBA – a delivery date may be entered against the item but is not mandatory. The user can enter a delivery date at a later time by recalling the POS docket. If a purchase order is created via the delivery option selected, when the delivery date is entered, the Due Date on the purchase order line will also be set to this date.


Delivery Date

This field is only enabled if the goods are to be delivered to the customer.

Select whether you want to enter a delivery date against this item. Options are:

  • Specified – a delivery date must be entered against the item. If a purchase order is created via the delivery option selected, the Due Date on the purchase order line will also be set to this date.
  • ASAP – no delivery date is to be entered against the item; the [Date] field is disabled. If a purchase order is created via the delivery option selected, when the Due Date is updated on the purchase order line, Micronet sets the item's date required to the same date.
  • TBA – a delivery date may be entered against the item but is not mandatory. The user can enter a delivery date at a later time by recalling the POS docket. If a purchase order is created via the delivery option selected, when the delivery date is entered, the Due Date on the purchase order line will also be set to this date.

2.8 Feature

For items not being picked up / delivered today, enter or select the estimated delivery date.


[Date]

For items not being picked up / delivered today, enter or select the estimated delivery date.

If you selected Specified in the Delivery Date field, you must enter or select a delivery date for the item. If you selected TBA in the Delivery Date field, you may enter a delivery date now or at a later time.


Consolidate

This field is only enabled if you selected a delivery option that produces a purchase order.

Select Yes if the order can be placed on a pallet along with other orders for your store, or No if the order should remain on its own pallet. If you select Yes, the separate orders will need to be sorted when they are received.


Technical Tip

In some companies, this field may be named Yard or Site instead of Consolidate. This means the Replace Consolidate Text field on the Default Settings for POS Enhanced screen in your company configuration is set to Yes – see "Edit - Applications - POS - POS Enhanced".

In this case, you can select whether stock should be delivered to the Yard (store) or to a specific building Site. When Yard is selected, you can consolidate several orders into one delivery.


Delivery To

If the item is being delivered to the customer, Micronet displays the customer's postal address. If you want to choose an alternative delivery address, choose the Delivery Adr button and select or create the delivery address. For more information, see "Adding a Delivery Address".


Supplier Information

Micronet displays any text entered against this supplier.


Item Information

Micronet displays any text entered against this item.


Warehouse

This field is only displayed if your company configuration is set to ask for the warehouse for each order line. (This is set in the Ask for Warehouse Each Line field on the Invoicing Configuration screen – see "Edit - Program - Invoicing".)

If this field is displayed, enter or select the warehouse that the item is to be supplied from.

If this field is not displayed, you can only select one warehouse per order. The warehouse from which the item will be supplied is entered on the Transaction Header screen.


Transfer

If the item is to be supplied from a warehouse other than the default warehouse, select Yes if you want the item to be invoiced by the warehouse that is supplying the item, or No if you want the item to be invoiced by the default warehouse.


Buy Price

Select the buy price on which you want Micronet to calculate the gross profit percentage for the item, and on which any automatic purchase orders for the item will be based. Options are:

  • Def Supplier Price – use the default supplier price for the item
  • Nett – use the net price for the item as entered in the Nett Cost field below
  • Average Cost – use the average cost for the item
  • Last Cost – use the last cost for the item
  • Buy 0 to Buy 7 – use a specific buy price.

If you are using barcode readers and scanning mode, you can change the selected price by pressing Page Up.


Technical Tip

If there is enough stock on hand to fill the order, Micronet defaults the buy price to the average cost.

If there is not enough stock to fill the order and a purchase order is being created (as per the selected Delivery Options), you can change the buy price as required.

If there is not enough stock to fill the order, no purchase order is being created and you change the buy price, Micronet displays a message and changes the buy price to the default supplier price.


Nett Cost

Micronet displays the cost of the item according to your selection in the previous field and according to the buy price for the item set in the Item master file – see "File - Inventory - Sell Price".

If you selected Nett in the Buy Price field, enter the net cost of the item.


Price

Select the applicable sell price for this customer (Retail, Trade, etc). If the applicable price is not available for selection or if you have agreed to a specific price, change the value to Nett and enter a value in the Nett Price field.

If you are processing a sale for a non-inventory item, Micronet displays the net price for the item. Enter the sell price.

Any price changes are stored in the Price Override Audit file for management reporting purposes.

The words "Contract Price" or Special Price" – along with the contract number or special price name – are displayed above the Price field if applicable. The expiry date of the contract or special price is also displayed in Micronet (2.8 feature).


Technical Tip

You cannot change the default sell price if:


Nett Price

Micronet displays the dollar figure relating to your selection in the Price field. If you selected Nett in the Price field, you can enter the net price.


Discount

If the debtor has a default discount matrix assigned in the Debtor master file, Micronet calculates and displays the applicable discount.

Alternatively, enter the amount or percentage of any discount that applies to this invoice. You select the type (e.g. dollar amount or percentage) in the Discount Type field.

If you want to assign the discount to specific discount categories, select the Dis button. For more information, see "Item Details - Dis".


Technical Tip

You cannot change the default discount if:


Discount Type

If you entered a discount in the previous field, select the discount type. Options are:

  • Percentage – the specified percentage of the total item value
  • Dollar – the specified amount in dollars
  • Cents – the specified amount in cents
  • Per Packet Price – this option is not used
  • % of Order – the specified percentage of the total order value.
 

Line Total

Micronet displays the total value of the line minus any discounts (i.e.quantity Ordered times Nett Price less Discount).


GP Percentage

If your user security allows you to view the GP percentage, Micronet calculates and displays the gross profit percentage per item/category using the values in the Nett Cost, Price and Discount fields.

Access to this field is set on the User File Update screen - Main tab – see "Maintenance - Edit UserIDs - 1. Main".


Warning

The GP percentage is calculated based on average cost. If you do not have enough stock on hand for the current order, the GP percentage will be recalculated when the stock is received based on the cost at which it is received. If you invoice the POS docket now and then view it again after the stock has been received, or you reprint the invoice using the Reprint Invoice program in MDS, it is important to note that the cost and GP percentage may have changed from those on the original invoice. These details will also be updated on inquiries and reports.

  1. Optionally, you can perform any of the following edits or actions on the Item Details screen if required:
  1. When you have finished maintaining the details for the order line, select the Accept button.

Micronet saves the details of the item you have added to this order. If you selected to add an item, Micronet redisplays the Item Details screen so you can add further items to this docket, layby or quote.


Technical Tip

If there is not enough stock of the item to fill the order, Micronet displays the following message:

Select OK to clear the message. If you are using Micronet 2.8, when you print the docket or finalise the order, Micronet displays a list of all items on the order with a negative stock on hand quantity. For more information, see "Dealing with Negative Stock (v2.8)".

  1. When you have finished adding and maintaining order lines, select the Cancel button to close the Item Details screen.

Micronet redisplays the Enter Transaction screen showing all the items added to this docket, layby or quote.